×
ToyotaParts- Hello
- Login or Register
- Quick Links
- Live Chat
- Track Order
- Parts Availability
- RMA
- Help Center
- Contact Us
- Shop for
- Toyota Parts
- Scion Parts
My Garage
My Account
Cart
OEM 2002 Toyota Celica Air Bag
Air Bag Module- Select Vehicle by Model
- Select Vehicle by VIN
Select Vehicle by Model
orMake
Model
Year
Select Vehicle by VIN
For the most accurate results, select vehicle by your VIN (Vehicle Identification Number).
1 Air Bag found

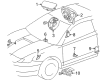
2002 Toyota Celica Passenger Air Bag, Dark Gray
Part Number: 73970-20081-B1$735.99 MSRP: $1078.61You Save: $342.62 (32%)Ships in 1-3 Business DaysProduct Specifications- Other Name: Air Bag Assembly, Instrument Panel; Instrument Panel Air Bag, Upper; Passenger Inflator Module; Air Bag Assembly, Instrument Panel Passenger
- Replaces: 73970-20080-B0, 73970-20081-B0
- Part Name Code: 73970A
- Item Weight: 10.10 Pounds
- Item Dimensions: 16.0 x 11.2 x 8.5 inches
- Condition: New
- Fitment Type: Direct Replacement
- SKU: 73970-20081-B1
- Warranty: This genuine part is guaranteed by Toyota's factory warranty.
2002 Toyota Celica Air Bag
Looking for affordable OEM 2002 Toyota Celica Air Bag? Explore our comprehensive catalogue of genuine 2002 Toyota Celica Air Bag. All our parts are covered by the manufacturer's warranty. Plus, our straightforward return policy and speedy delivery service ensure an unparalleled shopping experience. We look forward to your visit!
2002 Toyota Celica Air Bag Parts Q&A
- Q: How to remove and install the side Air Bag assembly on 2002 Toyota Celica?A: You should start by removing the front seat through an operation which includes taking out the 2 seat track covers and 4 bolts then disconnecting the side Air Bag connector while taking caution to avoid harming the Air Bag wire harness. The next step requires removing the reclining adjuster release handle along with the reclining adjuster knob and front seat cushion shield and the inner front seat cushion shield after unscrewing the screw. Disassemble the seat cushion assembly through harness connection deattachment along with unscrewing and removal of its four mounting bolts. Unfasten the seatback assembly by disconnecting hog rings on the seatback frame while also unscrewing its 4 bolts. Begin the installation by attaching the seatback assembly through its 4 bolts according to a torque specification of 43 N.m (440 kgf.cm, 32 ft.lbf). Additionally, install five new hog rings to the seatback frame while preventing wrinkles from forming. The seat cushion assembly should be installed by using 4 bolts which require tightening to 21 N.m (210 kgf.cm, 15 ft.lbf) while re-connecting the wire harness. Proceed with attaching the screw to the inner front seat cushion shield before repositioning the front seat cushion shield and reclining adjuster knob and reclining adjuster release handle. To complete the installation process the front seat requires connection of the side Air Bag connector followed by positioning at the most front position while ensuring the seat adjuster locks. First tighten the front bolts lightly to secure the position. Then apply the needed torque of 37 N.m (375 kgf.cm, 27 ft.lbf) to fully tighten the inner side bolts. Afterward move the seat forward to install the rear bolts using this same torque level and end with placing the 2 seat track covers.
Related 2002 Toyota Celica Parts
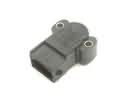 2002 Toyota Celica Throttle Position Sensor
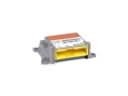 2002 Toyota Celica Air Bag Control Module
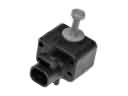 2002 Toyota Celica Air Bag Sensor
 2002 Toyota Celica Brake Light Switch
 2002 Toyota Celica Clock Spring
 2002 Toyota Celica Dimmer Switch
 2002 Toyota Celica Fuel Level Sensor
 2002 Toyota Celica Hazard Warning Switch
 2002 Toyota Celica Horn
 2002 Toyota Celica Ignition Lock Cylinder
 2002 Toyota Celica Knock Sensor
 2002 Toyota Celica Mirror Switch