×
ToyotaParts- Hello
- Login or Register
- Quick Links
- Live Chat
- Track Order
- Parts Availability
- RMA
- Help Center
- Contact Us
- Shop for
- Toyota Parts
- Scion Parts
My Garage
My Account
Cart
OEM 2010 Scion xD Air Bag
Air Bag Module- Select Vehicle by Model
- Select Vehicle by VIN
Select Vehicle by Model
orMake
Model
Year
Select Vehicle by VIN
For the most accurate results, select vehicle by your VIN (Vehicle Identification Number).
3 Air Bags found

2010 Scion xD Passenger Air Bag, Upper
Part Number: 73960-52131$685.68 MSRP: $1004.86You Save: $319.18 (32%)Ships in 1-3 Business DaysProduct Specifications- Other Name: Air Bag Assembly, Instrument Panel; Instrument Panel Air Bag, Upper; Passenger Inflator Module; Air Bag Assembly, Instrument Panel Passenger W/O Door
- Position: Upper
- Replaces: 73960-52130
- Part Name Code: 73960A
- Item Weight: 8.70 Pounds
- Item Dimensions: 14.9 x 11.3 x 8.0 inches
- Condition: New
- Fitment Type: Direct Replacement
- SKU: 73960-52131
- Warranty: This genuine part is guaranteed by Toyota's factory warranty.

2010 Scion xD Inflator Curtain, Driver Side
Part Number: 62180-52081$564.42 MSRP: $827.17You Save: $262.75 (32%)Ships in 1-3 Business DaysProduct Specifications- Other Name: Air Bag Assembly, Curtain Shield; Curtain Air Bag, Left; Head Air Bag; Air Bag Assembly, Curtain Shield, Driver Side
- Position: Driver Side
- Replaces: 62180-52050, 62180-52080
- Part Name Code: 62180A
- Item Weight: 11.70 Pounds
- Item Dimensions: 47.4 x 18.9 x 9.5 inches
- Condition: New
- Fitment Type: Direct Replacement
- SKU: 62180-52081
- Warranty: This genuine part is guaranteed by Toyota's factory warranty.
2010 Scion xD Inflator Curtain, Passenger Side
Part Number: 62170-52081$564.65 MSRP: $827.50You Save: $262.85 (32%)Ships in 1-3 Business DaysProduct Specifications- Other Name: Air Bag Assembly, Curtain Shield; Curtain Air Bag, Right; Head Air Bag; Air Bag Assembly, Curtain Shield, Passenger Side
- Position: Passenger Side
- Replaces: 62170-52080, 62170-52050
- Part Name Code: 62170A
- Item Weight: 11.60 Pounds
- Item Dimensions: 47.4 x 18.9 x 9.3 inches
- Condition: New
- Fitment Type: Direct Replacement
- SKU: 62170-52081
- Warranty: This genuine part is guaranteed by Toyota's factory warranty.
2010 Scion xD Air Bag
Looking for affordable OEM 2010 Scion xD Air Bag? Explore our comprehensive catalogue of genuine 2010 Scion xD Air Bag. All our parts are covered by the manufacturer's warranty. Plus, our straightforward return policy and speedy delivery service ensure an unparalleled shopping experience. We look forward to your visit!
2010 Scion xD Air Bag Parts Q&A
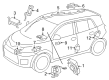
- Q: How to install the curtain shield Air Bag assembly on 2010 Scion xD?A: Installation starts with cutting off power at the battery negative terminal for 90 seconds to avoid Air Bag deployment. Mount the roof side rail bracket by fitting both hooks to body holes then tighten the bolt to 9.8 Nm (100 kgf-cm, 86 in-lbf). Complete the installation of the curtain shield back bracket by using the same process before torquing it to 9.8 Nm (100 kgf-cm, 86 in-lbf). When installing the RH side curtain shield Air Bag assembly,alonely use 4 brand-new clips together with 4 undamaged spacers while securing the clips in their proper orientation. Tighten Bolt A to 9.8 Nm (100 kgf-cm, 86 in-lbf) while Bolt B requires 14 Nm (143 kgf-cm, 10 ft-lbf) torque when securing the assembly preventing any twisting of components during installation. Push pins inside the clips to full insertion and apply marks which prevent clip re-use before you connect the Air Bag with its locking button situated tightly in place. After the Air Bag assembly is in place, proceed to install the roof headlining, seat belt anchor cover, shoulder belt anchor cover RH, rear center seat outer belt assembly, upper instrument panel sub-assembly, glove compartment door assembly, combination meter assembly, instrument cluster finish panel sub-assembly, instrument cluster finish center panel sub-assembly, map light assembly, room light assembly, visor holders, assist grip, front and center pillar garnishes, front seat outer belt assemblies, seat belt anchor cover caps, roof side inner garnish assemblies, deck trim side panel assemblies, rear seat outer belt assemblies, luggage hold belt striker assembly, rear deck trim cover, door opening trim Weather Strips, door scuff plates, cowl side trim boards, instrument panel under cover sub-assemblies, and rear seat assemblies for both sides, ensuring all components are installed securely and correctly. The negative terminal of the car needs the cable attachment with 5.4 Nm torque (55 kgf-cm or 48 in-lbf) to complete installation before checking the SRS warning light.
Related 2010 Scion xD Parts
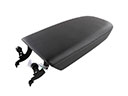 2010 Scion xD Armrest
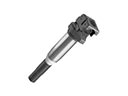 2010 Scion xD Ignition Coil
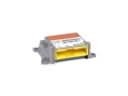 2010 Scion xD Air Bag Control Module
 2010 Scion xD Air Bag Sensor
 2010 Scion xD Clock Spring
 2010 Scion xD Fuel Pump Seal
 2010 Scion xD Fuel Pump Wiring Harness
 2010 Scion xD Horn
 2010 Scion xD Neutral Safety Switch
 2010 Scion xD Rear Passenger Door Handle Latch
 2010 Scion xD Turn Signal Flasher
 2010 Scion xD Wiper Arm